

Vagrant Hyper-v and Ansible for disposable infrastructure environments


In this article we will cover how to provision virtual machines and automate installation of servers using Vagrant, Hyper-v and Ansible. This can came in hand if you want to simulate a infrastructure provider and don't want to use cloud. Maybe you have enough RAM and processor power to run it locally.
Before we get started lets cover some basics.
Alternatives to this method
If you don't want use you local machine, and maybe want to mimic production workloads you can use Terraform or Pulumi as alternatives to vagrant. This two software are more capable of provisioning in cloud environments like AWS or Azure. This way you could as with minimal effort reuse it in production on your work. The downside is that you have to pay for resources you use and depending on usage could not be cost effective.
As of the ansible part it covers post provision, so you still have advantages by learning this tool, even in cloud environments.
If you just want a dev environment with local services like database, then the best and more productive alternative is to use docker and docker-compose to declare your services and run it in just one command. This performs better and as I said is more straightforward.
You can also replace hyper-v with other VM provider.
Vagrant
Vagrant is a virtual machine provision tool that can automate the creation of VM's with predefined configurations. In this tool you can replicate a environment without manual intervention (mostly)
Vagrant also supports different providers (virtual machine technologies) like Vmware, Virtualbox, Libvirt, and even some cloud providers.
It works by interpreting a declarative configuration file that describes your requirements, packages, operating system configuration, users, and more. It will download a VM disk from the internet and use it as a base for cloning and creating the VM.
Works on Windows, Mac and Linux
Hyper-V
Hyper-v is a type 1 hypervisor build in in Windows Server, Windows >= 8 and is a performant free way to run virtual machines, if you already have a windows license.
The type 1 means it runs directly on the hardware, and even the host OS also runs as a VM with elevated privileges. Because of this your Windows 10 (Host) machine will run as a VM, but don't worry, it has access to hardware acceleration and even running games on it should not have a big performance drop.
Its oriented on server workload so you don't have more customer oriented functionality like easy USB access in the guest VM, but you can run GUI software on Windows and Linux, although a little laggy because is a Remote Desktop session.
Note: In the Microsoft documentation it says is available only in Pro, Enterprise and Educational editions of windows, but in fact you can enable it in Home edition. For example docker for windows in the WSL2 backend uses Hyper-V and you can nowadays do it in Home editions. For more info check https://www.makeuseof.com/install-hyper-v-windows-11-home/
I'm not covering all differences to alternatives like virtualbox and vmware play or workstation, but be in mind that it has a limited support for guest operation systems, like windows XP and some old Linux kernels, if you want a broad range of support you can use virtualbox or vmware which are type 2 hypervisors.
Ansible
Ansible is an automation configuration tool that do not require an agent to run in the target machine. It connects to the machine thought SSH and runs commands and python configuration modules.
The only requirement is a previous installation of python in the machine, which most Linux distributions offer out of the box.
The majority of ansible modules and extensions are idempotent. That means it only performs operations when the state of the target machine differs from the desired state, which basically means you can run the ansible playbook many times that it will sync with the machines.
With ansible you can save time, eliminate repetitive tasks, have fewer mistakes and improve collaboration.
It works by reading configuration files and applying its modules states in target machines.
It has build in modules for apt get management, file management, script, managed system services and much more.
Note: Is not in the scope of this article to teach you how to use this tools, previous basic knowledge is good
Getting Started
The first thing we need is the Hyper-V enabled. On Windows 10 or 11 Home follow this instructions
In Pro editions of windows follow this
Once you reboot you are good to install vagrant.
Once installed let's do some basic machine provision. Create a new directory, you can name it as you whish. I call it infra-hyperv
Open a powershell with admin rights (that's because hyperv requires admin privileges to interact)
In the folder you create run the command
vagrant init generic/ubuntu2204 # (1)
vagrant up --provider=hyperv # (2)
- We are create a Vagrantfile based on a VM image generic/ubuntu2204. Please note that this image has to have support for the provider
- The second command brings the machine to life. It will download the image and run a 'default' machine
You can check the machine running in Hyper-V manager:
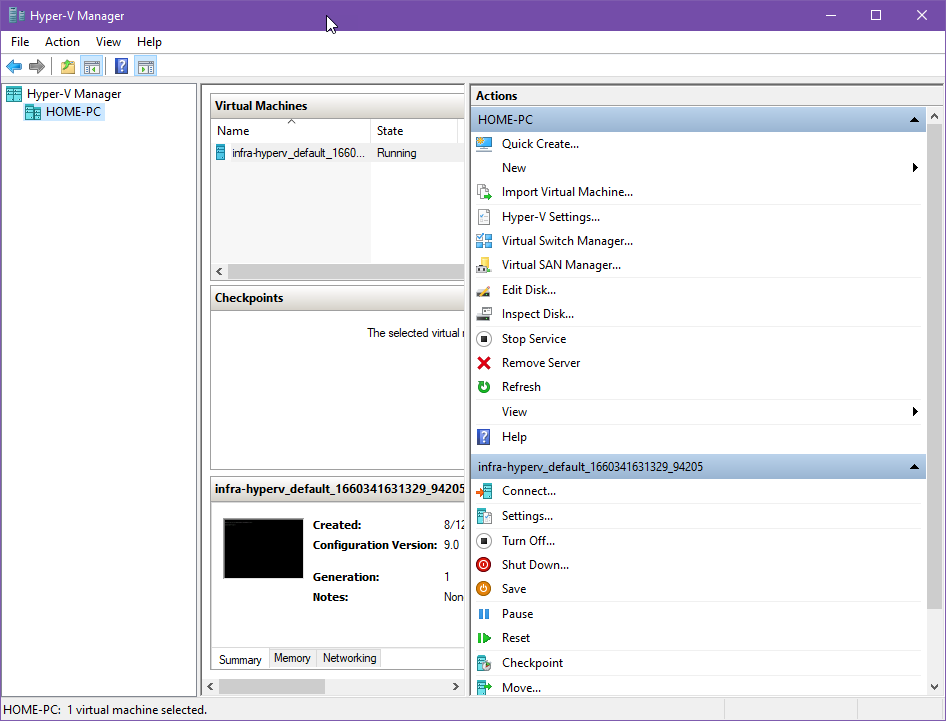
Vagrant adds the folder name to the machine name to avoid collisions.
You can ssh into the machine with the command:
vagrant ssh default
The output is something like:
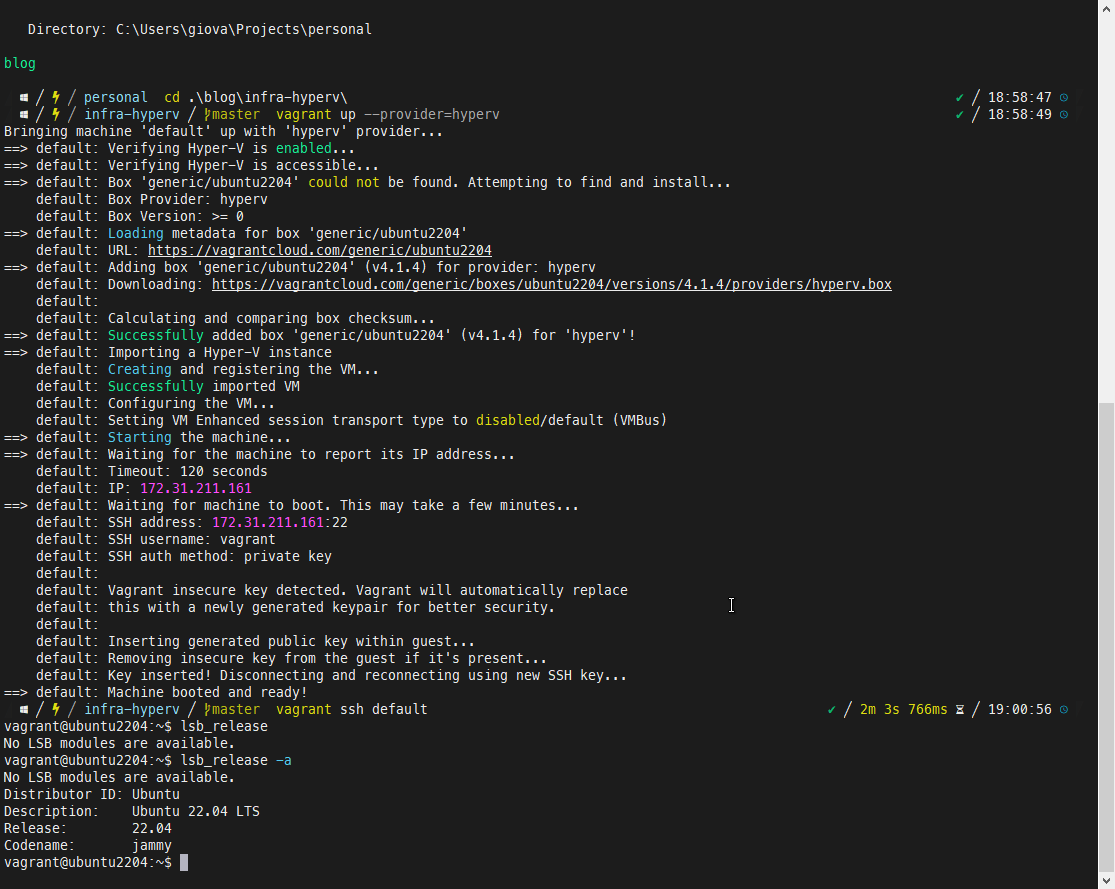
When vagrant creates the machine it will generate a ssh-key to authenticate with the guest.
The private key is created in .vagrant/machines/default/private_key
Also the disks, snapshots and other information is in the .vagrant folder. So you must ignore this folder in version control systems.
Good, now there is a problem: Hyper-v will add a different ip to your machine each time it boots. That's a problem because we don't have a way to tell ansible this ip address from vagrant, we need a way to overcome this.
Automating static ip address to the VM's
This is not so simple as it may sound. In other providers vagrant can do it simpler using the Vagrantfile, but in hyper-v there is more to address.
Theory:
- You need a internal only new Nat switch for hyper-v. Guests in this network will have access to any network resources to which the host has access, like Internet or a LAN.
- Configure vagrant trigger that leverages the vagrant-reload plugin to change a given VM's network switch on-demand.
- On initial provision (vagrant up) choose the Default Switch. So vagrant can provision the VM correctly
- At the beginning of the provisioning process, configure a static IP within the VM's operating system.
- Call
config.vm.provision :reloadwhich will file a trigger defined in step 2, thereby changing the VM's network switch to the new NatSwitch and issuevagrant reloadand continue the provisioning process after the VM reboots. - When the VM reboots, it will acquire the static IP address from the NATSwitch and use it indefinitely
Fortunately we can automate most of this process.
1. Create the Nat Switch
This process can be done once, manually but lest do it in a script called in the Vagrantfile.
Create the file scritps/create-nat-hyperv-switch.ps1
# See: https://www.petri.com/using-nat-virtual-switch-hyper-v

If ("NATSwitch" -in (Get-VMSwitch | Select-Object -ExpandProperty Name) -eq $FALSE) {
    'Creating Internal-only switch named "NATSwitch" on Windows Hyper-V host...'

    New-VMSwitch -SwitchName "NATSwitch" -SwitchType Internal

    New-NetIPAddress -IPAddress 192.168.10.1 -PrefixLength 24 -InterfaceAlias "vEthernet (NATSwitch)"

    New-NetNAT -Name "NATNetwork" -InternalIPInterfaceAddressPrefix 192.168.10.0/24
}
else {
    '"NATSwitch" for static IP configuration already exists; skipping'
}

If ("192.168.10.1" -in (Get-NetIPAddress | Select-Object -ExpandProperty IPAddress) -eq $FALSE) {
    'Registering new IP address 192.168.10.1 on Windows Hyper-V host...'

    New-NetIPAddress -IPAddress 192.168.10.1 -PrefixLength 24 -InterfaceAlias "vEthernet (NATSwitch)"
}
else {
    '"192.168.10.1" for static IP configuration already registered; skipping'
}

If ("192.168.10.0/24" -in (Get-NetNAT | Select-Object -ExpandProperty InternalIPInterfaceAddressPrefix) -eq $FALSE) {
    'Registering new NAT adapter for 192.168.10.0/24 on Windows Hyper-V host...'

    New-NetNAT -Name "NATNetwork" -InternalIPInterfaceAddressPrefix 192.168.10.0/24
}
else {
    '"192.168.10.0/24" for static IP configuration already registered; skipping'
}
Then add the trigger on top of the Vagrantfile config section.
config.trigger.before :up do |trigger|
    trigger.info = "Creating 'NATSwitch' Hyper-V switch if it does not exist..."

    trigger.run = {privileged: "true", powershell_elevated_interactive: "true", path: "./scripts/create-nat-hyperv-switch.ps1"}
end
2. Configure Vagrant Reload Trigger
Install the reload plugin with the command:
vagrant plugin install vagrant-reload
Create a script to be executed: ./scripts/set-hyperv-switch.ps1
# See: https://www.thomasmaurer.ch/2016/01/change-hyper-v-vm-switch-of-virtual-machines-using-powershell/

Get-VM "default" | Get-VMNetworkAdapter | Connect-VMNetworkAdapter -SwitchName "NATSwitch"
Configure the machine name in the hyper-v to be default instead of a generated one, so the script above can work. In Vagrantfile:
config.vm.define "default"
config.vm.provider :hyperv do |hy|
    hy.vmname = "default"
end
Configure the Vagrantfile to call the trigger, add just below the previous trigger created
config.trigger.before :reload do |trigger|
    trigger.info = "Setting Hyper-V switch to 'NATSwitch' to allow for static IP..."

    trigger.run = {privileged: "true", powershell_elevated_interactive: "true", path: "./scripts/set-hyperv-switch.ps1"}
end
3. Configure Static IP Within Guest VM
Configuring a static IP is an OS-specific task, so this procedure should be adjusted to suit the specific guest OS. We are using ubuntu:
Create a script in scripts/configure-static-ip.sh
#!/bin/sh

echo 'Setting static IP address for Hyper-V...'

cat << EOF > /etc/netplan/01-netcfg.yaml
network:
  version: 2
  ethernets:
    eth0:
      dhcp4: no
      addresses: [192.168.10.2/24]
      gateway4: 192.168.10.1
      nameservers:
        addresses: [8.8.8.8,8.8.4.4]
EOF
With the above script in place, add something like this just below the trigger definitions that we added earlier:
4. Provision the VM
vagrant destroy
vagrant up --provider=hyperv
Choose the Default Switch when prompted
Using multiple VM's
To use multiple VM's we need to adapt the scripts and Vagrant file. The results are as follow:
Vagrantfile
Vagrant.configure("2") do |config|

  config.trigger.before :up do |trigger|
    trigger.info = "Creating 'NATSwitch' Hyper-V switch if it does not exist..."

    trigger.run = {privileged: "true", powershell_elevated_interactive: "true", path: "./scripts/create-nat-hyperv-switch.ps1"}

  end

  config.trigger.before :reload do |trigger|
    trigger.info = "Setting Hyper-V switch to 'NATSwitch' to allow for static IP..."

    trigger.run = {privileged: "true", powershell_elevated_interactive: "true", path: "./scripts/set-hyperv-switch.ps1"}
  end

  config.vm.provision :reload
  config.vm.define :vm1 do |vm|
     vm.vm.box = "generic/ubuntu2204"
     vm.vm.provision "shell", path: "./scripts/configure-static-ip.sh", args: "192.168.10.2"
     vm.vm.provision :reload
     vm.vm.provider :hyperv do |hy|
      hy.vmname = "vm1"
      # hy.maxmemory = 1024
      hy.memory = 1024
      # hy.cpus = 2
    end
  end
  config.vm.define :vm2 do |vm|
    vm.vm.box = "generic/ubuntu2204"
    vm.vm.provision "shell", path: "./scripts/configure-static-ip.sh", args: "192.168.10.3"
    vm.vm.provision :reload
    vm.vm.provider :hyperv do |hy|
     hy.vmname = "vm2"
    #  hy.maxmemory = 1024
     hy.memory = 1024
    #  hy.cpus = 2
   end
 end


end
scripts/configure-static-ip.sh
#!/bin/sh

echo 'Setting static IP address for Hyper-V...'

cat << EOF > /etc/netplan/01-netcfg.yaml
network:
  version: 2
  ethernets:
    eth0:
      dhcp4: no
      addresses: [$1/24]
      gateway4: 192.168.10.1
      nameservers:
        addresses: [8.8.8.8,8.8.4.4]
EOF

# Be sure NOT to execute "netplan apply" here, so the changes take effect on
# reboot instead of immediately, which would disconnect the provisioner.
scripts/set-hyperv-switch.ps1
# See: https://www.thomasmaurer.ch/2016/01/change-hyper-v-vm-switch-of-virtual-machines-using-powershell/

Get-VM "vm1" | Get-VMNetworkAdapter | Connect-VMNetworkAdapter -SwitchName "NATSwitch"
Get-VM "vm2" | Get-VMNetworkAdapter | Connect-VMNetworkAdapter -SwitchName "NATSwitch"
In the example above we create two machines vm1 and vm2 and set the ip address as 192.168.10.2 and 192.168.10.3 respectively
Post VM provision with Ansible
Now is time to use ansible for the configuration of the VM. If you already know ansible this should be straightforward.
In this example we will configure apache and display a hello world page in both VM's
First we need to install ansible. It works best in a Linux environment, so I suggest you to install in WSL environment.
To get a WSL Ubuntu working check
https://www.youtube.com/watch?v=n-J9438Mv-s
After that open a WSL shell and install ansible with the command:
sudo apt-get update
sudo apt-get install ansible
We will create a directory ansible and will add a inventory file name inventory/inventory.yaml
all:
  hosts:
    vm1:
      ansible_ssh_private_key_file: ../.vagrant/machines/vm1/hyperv/private_key
      ansible_user: vagrant
      ansible_host: 192.168.10.2
    vm2:
      ansible_ssh_private_key_file: ../.vagrant/machines/vm2/hyperv/private_key
      ansible_user: vagrant
      ansible_host: 192.168.10.3
Lets test ansible communication with the VM's
ansible -i inventory/inventory.yaml -m ping all
You will probably get a failure like this:
vm1 | UNREACHABLE! => {
    "changed": false,
    "msg": "Failed to connect to the host via ssh: ssh: connect to host 192.168.10.2 port 22: Connection timed out",
    "unreachable": true
}
vm2 | UNREACHABLE! => {
    "changed": false,
    "msg": "Failed to connect to the host via ssh: ssh: connect to host 192.168.10.3 port 22: Connection timed out",
    "unreachable": true
}
That is because WSL doesn't have access to the VSwitch the VM's are plugged. We can fix that with the following power shell:
Get-NetIPInterface | where {$_.InterfaceAlias -eq 'vEthernet (WSL)' -or $_.InterfaceAlias -eq 'vEthernet (NATSw
itch)'} | Set-NetIPInterface -Forwarding Enabled -Verbose
The command above set the Forward in the WSL Interface and in the NATSwitch interface to Enabled
Fixing private key permissions
We also need to fix the private key permissions because SSH required it. First we need to enable metadata attribute in the c: volume to permissions work
Temporally:
cd
sudo umount /mnt/c
sudo mount -t drvfs C: /mnt/c -o metadata
Permanently:
sudo vim /etc/wsl.conf
# add this lines
[automount]
enabled = true
root = /mnt
options = "metadata"
mountFsTab = true
Now change the group and permissions to be the same as your username, my is giova
sudo chown root:giova ../.vagrant/machines/vm1/hyperv/private_key
sudo chown root:giova ../.vagrant/machines/vm2/hyperv/private_key
sudo chmod 660  ../.vagrant/machines/vm1/hyperv/private_key
sudo chmod 660 ../.vagrant/machines/vm2/hyperv/private_key
Now you can finally test the connection:
ansible -i inventory/inventory.yaml -m ping all
If is working you get the output:
vm2 | SUCCESS => {
    "ansible_facts": {
        "discovered_interpreter_python": "/usr/bin/python3"
    },
    "changed": false,
    "ping": "pong"
}
vm1 | SUCCESS => {
    "ansible_facts": {
        "discovered_interpreter_python": "/usr/bin/python3"
    },
    "changed": false,
    "ping": "pong"
}
Creating the playbook
Create the folder structure below:
inventory
|__inventory.yaml
roles
|__apache
   |__tasks
   |  |__main.yaml
   |__templates
   |__|__index.html.j2
|__site.yml
In the file roles/apache/tasks/main.yaml add the yaml configuration:
- name: install apache web server
  apt: name=apache2 state=present
- name: add hello world page index.html
  template:
    src: ../templates/index.html.j2
    dest: /var/www/html/index.html
In roles/apache/template/index.html.j2 add the html:
<html>
<head>
    <meta charset="UTF-8">
    <title>Ansible Hello World</title>
</head>
<body>
<h1>Hello world from {{ inventory_hostname }} </h1>
<body>
We created a role that
- Install apache2 package using apt-get in first task
- Add a index.html page to /var/www/html/index.html with the contents of ../templates/index.html.j2 replacing all variables in the template (inventory_hostname is the name of the machine in the inventory of ansible)
In site.yml add the code:
---
- hosts: all
  become: yes
  roles:
  - apache
This code applies the apache role we create for all hosts. We need the become set to yes to be root because your ssh user is vagrant
Now run the playbook with the command:
ansible-playbook -i inventory/inventory.yaml site.yml
After the playbook you should check the pages in the VM's ip addresses
You can check all code for this article in https://github.com/giovannicandido/blog-hyperv-ansible-vagrant
Conclusion
By using the tools presented in this article you can play with infrastructure automation and developer environment though virtual machines.
We cover up some limitations in Hyper-v and WSL in order to have the most streamline experience possible. Fortunately most of the procedures can be automated after you cover all the requirements.
References
https://automatingops.com/allowing-windows-subsystem-for-linux-to-communicate-with-hyper-v-vms
https://docs.ansible.com/ansible/2.3/playbooks_best_practices.html
https://superuser.com/questions/1354658/hyperv-static-ip-with-vagrant